Creating your first flowRequires Pro
Build a first Node-RED automation and send an OSC message from Time-line Live.
Time-line Live uses Node-RED to build automations. Node-RED is a visual programming tool used to connect inputs, process information, and send outputs — without requiring traditional programming. It has a large community and is used for everything from home automation projects to large-scale industrial systems. This means there are plenty of resources available online if you want to go beyond the examples covered in this documentation. You can find more info about Node-RED here: https://nodered.org/.
Time-line adds its own nodes to Node-RED, allowing your flows to react to the music. In this guide, we’ll create a simple flow from scratch and send your first message from Time-line Live to another application.
Get Started
Node-RED revolves around a system of inputs, transformations and outputs. Time-line provides information about what's happening in the music — for example, when a Drop starts, the active track gets swapped, the BPM changes, or how far a Build has progressed. You decide what to do with that information and where to send it.
For most setups, we recommend using the Time-line provided Output nodes. These send out signals using Open Sound Control (OSC), a protocol for sending signals between audio and multimedia devices.
Note: This documentation uses OSC as the output protocol. However, Time-line Live also supports MIDI and Art-Net inputs and outputs so use what makes most sense for you.
To test your first flow:
Choose something to receive your messages. Any application or device that accepts OSC will work.
No gear handy? Protokol (free) is an easy monitor. Open it and enable OSC, it listens on port 8000. We’ll use this setup below.
In the Time-line Live home screen, open Automations, enable the Automations toggle, then click Add flow in Node-RED. Node-RED opens in your browser, ready for you to create your first flow.
The Node-RED Editor
The Node-RED Editor is where you build and customize your automations. You create flows by dragging nodes onto the workspace and connecting them together. Each node represents an input, condition, action, or output.
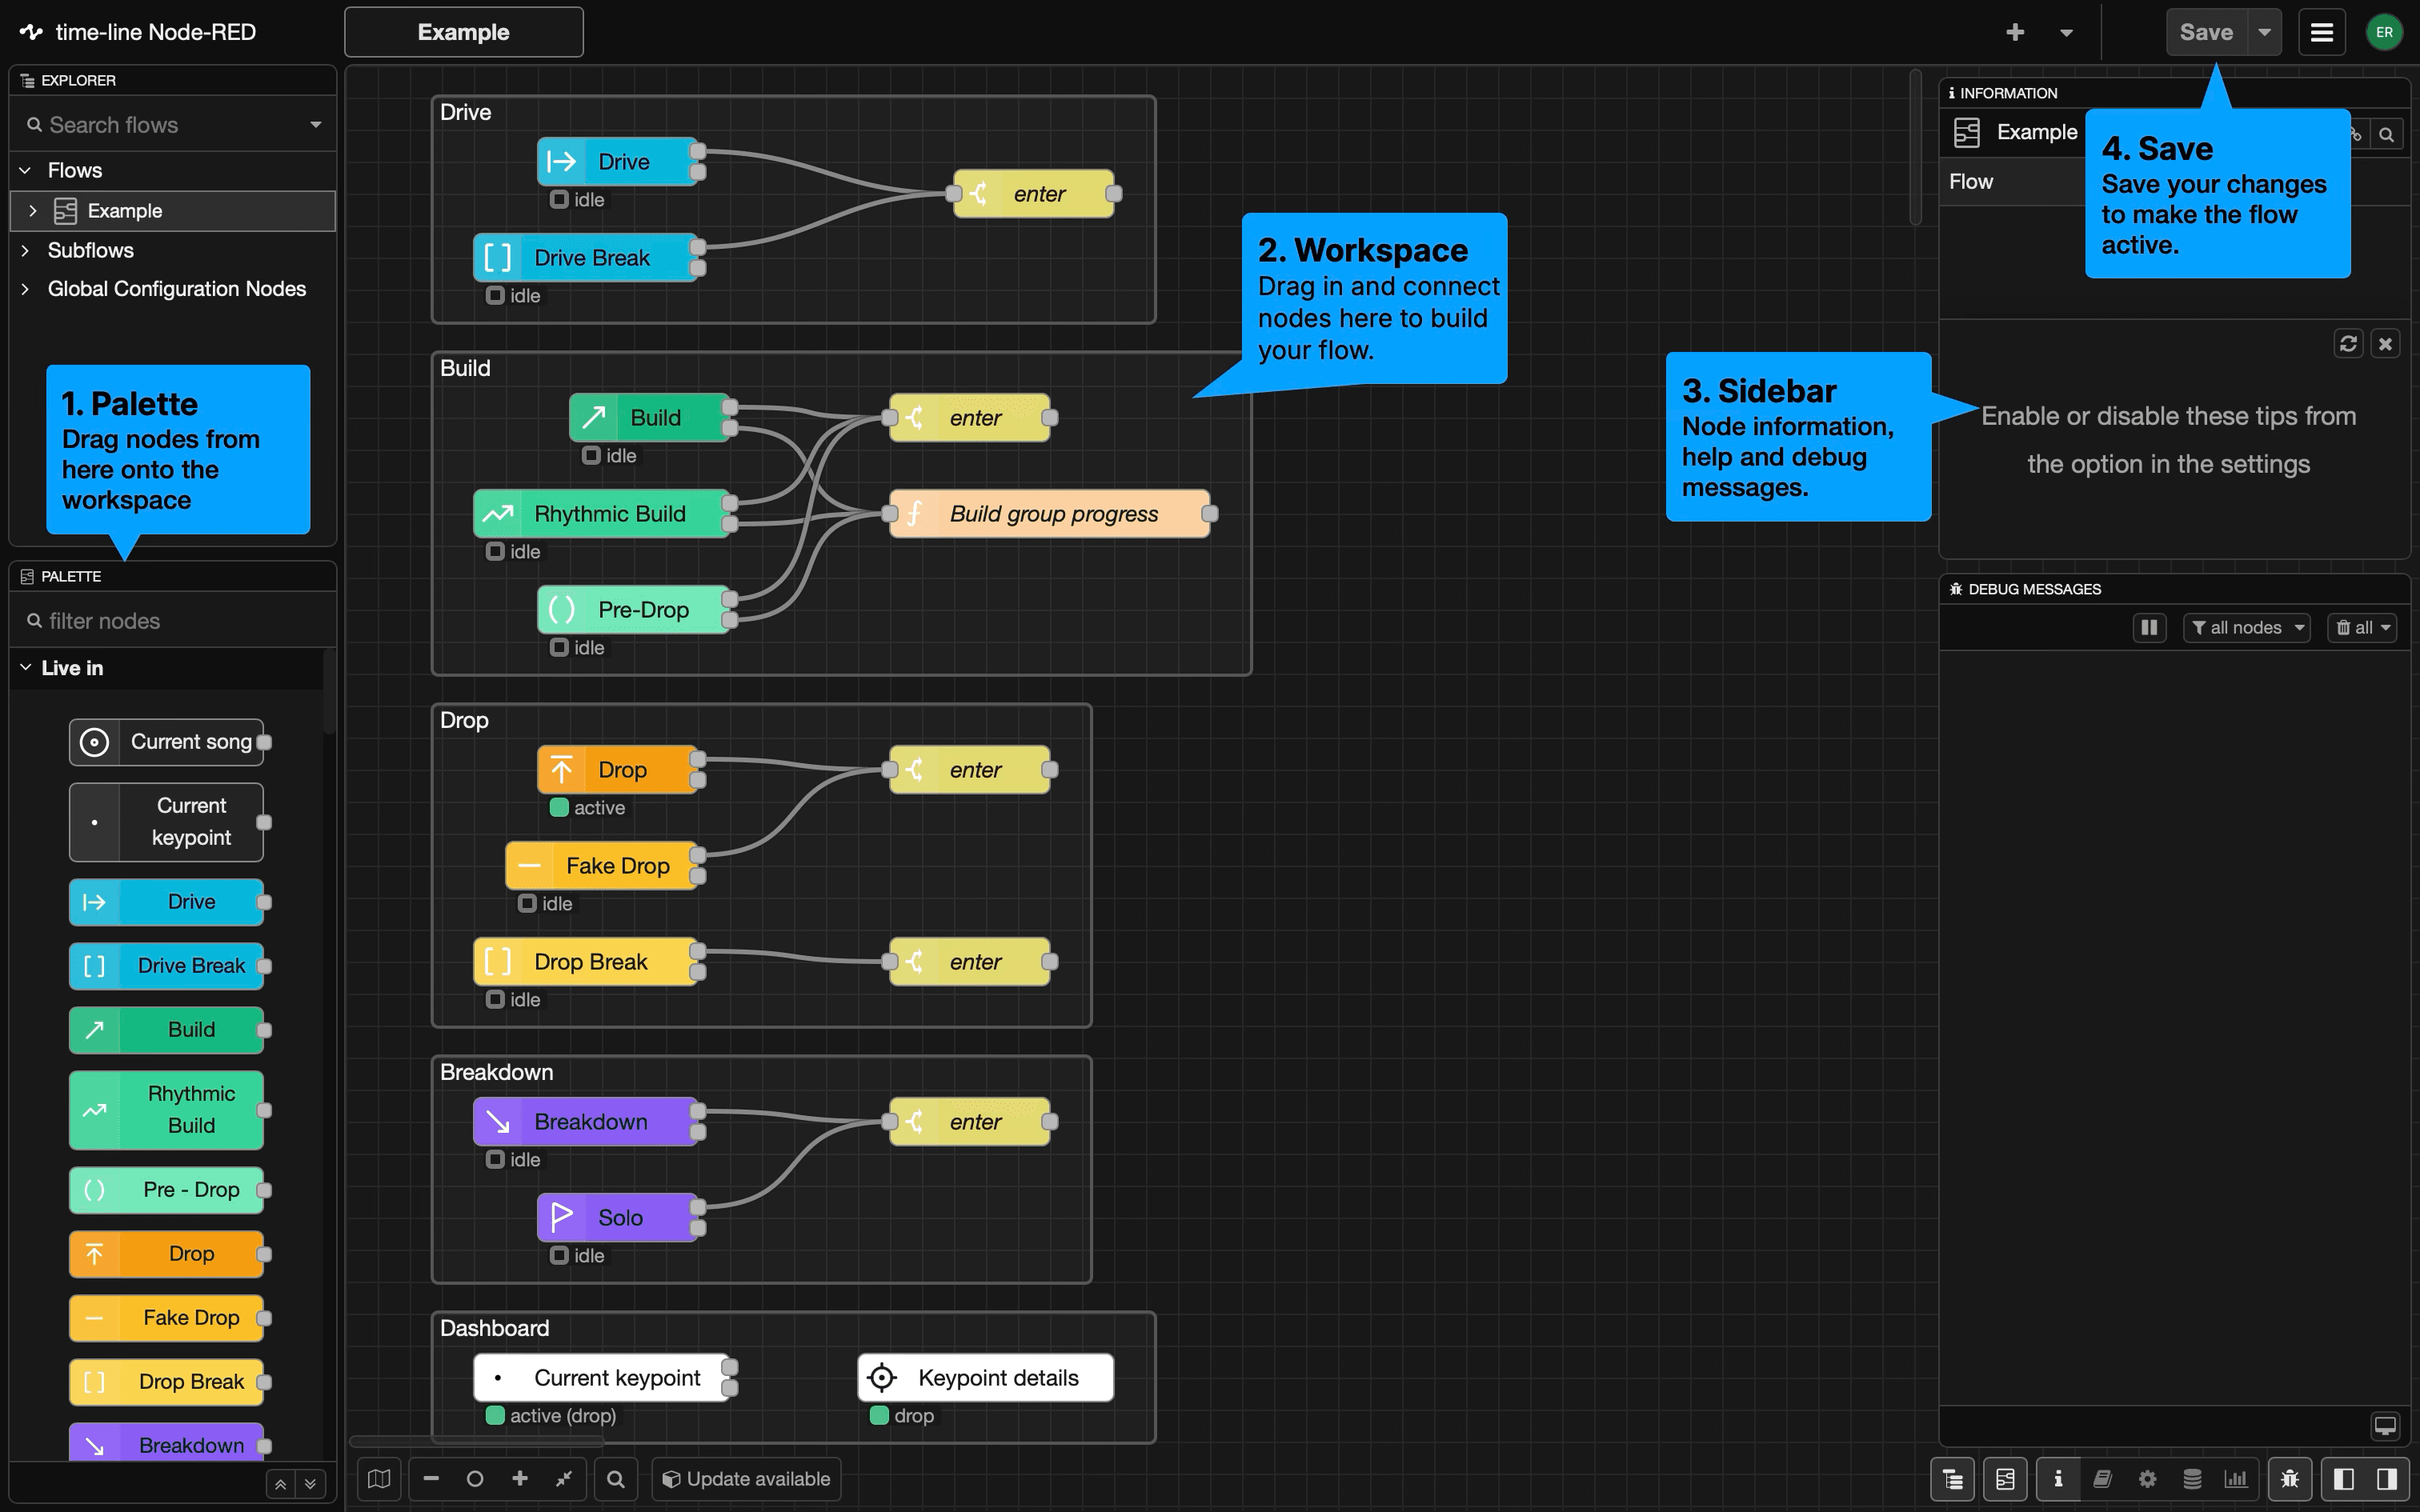
Palette — All available nodes live here. Time-line nodes are grouped at the top. Drag a node onto the workspace to use it.
Workspace — Build your automation here by placing nodes and connecting them together.
Sidebar — Shows information, help and debug messages. Hover over any node in the palette and click the book icon to open its documentation here.
Save — Applies your changes. Nothing runs until you click Save.
New to Node-RED? Read Node-RED Concepts and the Editor Guide.
Node Inputs and Outputs
Node-RED nodes receive and send messages through connectors. You can connect multiple nodes to the same connector.
Input connectors appear on the left side of a node, and output connectors on the right. Hover over a connector to see what type of message it can receive or send.
Send Your First Message
Watch the quick walkthrough below, or follow the steps underneath.
Drag an Inject node and an Output node onto the workspace. Connect them together by dragging the output dot to the input dot.
Double-click Output.
Click the + button next to Server. To test with Protokol, enter name: Protokol host: 127.0.0.1, port: 8000. Or enter the IP address and port of your own receiver.
Click Add.
Set Address to /time-line/test, Message to hello and Label test . Click Done.
Click Save top right to save your changes.
Click the small button on the left side of the Inject node to trigger it.
hello appears in your receiver, Protokol or the device you configured. That's the basic idea: something happens → a message goes out.
Input nodes tell you what’s happening. Output nodes let you send that information to your show systems. The Server setting inside Output determines where each message goes. Server configurations are saved and reusable. Create one for each show system or receiver — for example, Protokol, grandMA, or Resolume — then select it in any Output node. If you edit the server configuration, every Output node using it updates automatically.
Connect to Key Points
Now replace the manual trigger with a Time-line Key Point. In this example, the message will fire whenever a Drop starts.
First, it’s important to note that Key Point nodes have two output connectors: Event and Stream.
Drop Event → Enter → Output
-
Event (top) sends one message when the section starts and one when it ends.
Use Events for actions that happen once. Example, fire a console cue on the Drop, launch a Resolume clip when a Breakdown starts, or reset the rig when the section ends.
-
Stream (bottom) sends around ~30 messages per second while the section is active, carrying live progress.
Use Streams for everything that moves. Example, ramp a fader through a Build, fade video opacity across a Breakdown, or change the strobe rate as a Drop progresses.
Rule of thumb: events trigger, streams animate. For now, we'll use Events—the top connector. See Using Key Points in Node-RED to learn how Streams and Progress can create effects that evolve over time.
Connect the top output of Drop → Enter → your existing Output node. (See The Node inputs and outputs for more info)
Click Save.
Play a track. When Time-line Live reaches a Drop, the message hello is sent to your receiver.
You can replace Drop with any other Key Point node to trigger messages at different sections of the track.
Nothing arriving?
If your message isn't reaching your receiver, check:
- Did you click Save after making changes?
- Is Automations enabled in Time-line Live?
- Is your flow enabled in Node-RED?
- Does a node show ws disconnected? Make sure Time-line Live is running.
- Sending to another device? Make sure your Mac and the receiving device are on the same network and that the IP address and port in your Server configuration are correct.
- Still nothing? Check whether a firewall or security application is blocking UDP traffic.
Add Custom Logic with Function Nodes
So far, your flow sends the same message every time a Drop occurs. For a real show, you'll often want more control.
For example, suppose you don't want your automation to fire on every Drop. You only want it to fire when certain conditions are met. A Function node can inspect the information coming from Time-line Live and decide what happens next.
Drop → Enter → Function → Output
A Function node lets you add custom logic using JavaScript. It can:
- Check information about what's happening in the music.
- Decide whether to continue, i.e. send the message on, or stop it.
- Change the message before it reaches your Output node.
For example, you could create an automation that fires only when a Drop is followed by a Breakdown. The Function checks the next Key Point. If it isn't a Breakdown, it stops the message. If it is a Breakdown, the message continues to your Output node.
Here’s what the JavaScript looks like:
// Only continue if the Drop is followed by a Breakdown
if (msg.payload.nextKeypoint !== 'breakdown') {
    return null;
}
return msg;msgis the message coming into the Function node.msg.payloadcontains the main data carried by the message.return nullstops the message.return msgpasses the message on to the next node.
So in plain English, the Function says: if the next Key Point isn't a Breakdown, stop. Otherwise, continue.
That's enough to get started. Function nodes can also change messages and perform much more advanced logic. The Node-RED Example Flows use Functions for this — import one and open its Function nodes to see how they're built.
For more, see Node-RED’s guide on Writing Functions.
Next
- Explore the Time-line nodes available in Node-RED: Using Time-line Node-RED Nodes
- Learn how to use Key Points, Groups, Families and Progress: Using Key Points in Node-RED
- Start with a ready-made flow. Explore the Node-RED Example Flows
- Replace Protokol with your actual show system: Connecting Your Show System.
How is this guide?
Last updated on